
Your kitchen’s fruit display is either a vibrant centerpiece or a forgotten corner; there’s rarely an in-between.
I’ve discovered that the right basket setup changes how you eat, cook, and even perceive your space.
But here’s what most people miss: it’s not just about picking pretty containers.
The real success comes when you combine the right materials, strategic placement, and a system that actually works.
Let me show you how.
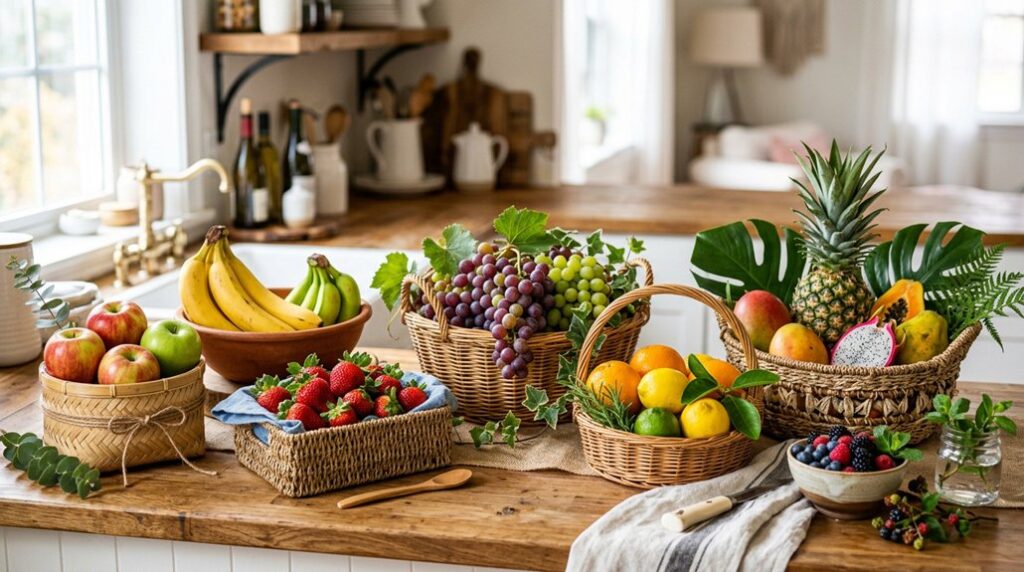
Choose a Fruit Basket Material That Matches Your Kitchen

Why settle for a fruit basket that clashes with your kitchen’s personality? I’ve found that matching your basket material to your décor makes it both functional and visually appealing.
For rustic charm, wicker baskets create that warm, inviting farmhouse feel we all crave. They pair beautifully with traditional kitchens and make fruit look purposefully displayed rather than randomly stored.
If you’re rocking a modern kitchen, metal or wire baskets deliver that sleek, minimalist edge. They’re practical too; just wipe them clean and you’re done.
Ceramic baskets are my go-to accent pieces. They don’t just hold fruit; they draw attention on your countertop.
Here’s what matters most: durability and visual harmony. Your basket should complement your kitchen’s style while actually supporting your fruit without collapsing. That’s the ideal balance.
Arrange Fruits by Color and Size for Maximum Impact
I’ve found that organizing your fruits by color creates a natural visual flow that draws the eye across your countertop. Try grouping reds, yellows, and greens to form a subtle rainbow effect.
You’ll want to layer larger fruits like apples and pears at the base while positioning smaller berries and citrus toward the top, which keeps your arrangement stable and visually balanced. This strategic pairing of complementary fruits doesn’t just look intentional; it also helps you notice when something needs replacing, so your display stays fresh and vibrant week after week.
Rainbow Color Organization
A strategically arranged fruit basket becomes kitchen art when you organize by color and size, turning ordinary produce into a visual feast. I’ve discovered that rainbow organization creates impressive visual impact while making fruit selection effortless.
Start with red apples at the base, then layer orange citrus, yellow bananas, green pears, and purple grapes upward. This sequence naturally guides your eye across the spectrum. I use tiered or hanging fruit baskets to display each color group at different heights, adding depth and accessibility.
The key is placing heavier, darker fruits below lighter ones to prevent crushing. Small accent berries, such as blueberries or strawberries, scattered within color blocks reinforce your design while adding texture.
Rotate your fruits weekly to maintain vibrancy and freshness, keeping your rainbow organization seasonally dynamic and consistently beautiful.
Size Layering Techniques
How you stack your fruit matters just as much as which fruits you choose. I’ve discovered that strategic layering creates a basic display into something truly captivating.
Here’s my approach to creating visual balance:
- Position larger fruits (apples, oranges) on the bottom for stability
- Layer mid-sized fruits in the middle section for depth
- Arrange small berries around larger pieces to balance weight
- Employ vertical space with tiered displays or hanging fruit baskets
- Prevent crowding by spacing items thoughtfully
This pyramid-style arrangement isn’t just pretty; it’s practical. When I started using multi-level baskets, my kitchen instantly felt more intentional. You’re fundamentally building a foundation that supports everything above it.
Visual Impact Strategies
Once you’ve got your foundation solid with proper layering, color and size arrangement makes that basic structure visually interesting. I’ve discovered that grouping fruits by color—reds with oranges, yellows with golds—creates natural visual rhythm.
Your fruit display gains immediate impact when you position glossy, vibrant pieces toward the front and lighter tones toward the back. This depth strategy makes everything stand out.
| Color Zone | Fruits | Placement |
|---|---|---|
| Red | Apples, strawberries | Front center |
| Orange | Oranges, peaches | Mid-front |
| Yellow | Bananas, pineapples | Mid-back |
| Green | Limes, kiwis | Back edges |
| Purple | Grapes, plums | Top accent |
You’re creating a well-organized color display. Small gaps between items prevent crowding while herb accents maintain unity. This approach turns your kitchen into a gallery-like arrangement.
Utilize Vertical Space With Hanging and Tiered Baskets
I’ve found that hanging baskets and tiered stands make better use of cramped kitchens by claiming vertical space you’re probably not using. A 2-tier macrame basket with adjustable hooks lets you showcase everything from apples to avocados while keeping your countertops clear.
Here’s the trick: stack heavier fruits below and lighter ones up top, so you get both balance and easy access to what you need.
Hanging Baskets Save Space
Why let your countertops bear all the burden of fruit storage? I’ve discovered that hanging baskets free up valuable counter real estate in kitchens. Here’s what makes this space-saving solution work so well:
- Vertical utilization – Hanging baskets use wall and ceiling areas you’re likely ignoring
- Aesthetic appeal – Macramé and wire designs add rustic or modern flair to any kitchen
- Maximum capacity – Tiered arrangements hold surprising amounts while staying accessible
- Better air circulation – Breathable designs prevent moisture buildup and mold
- Easy rotation – Weekly fruit checks keep everything fresh and organized
I’ve found that pairing hanging baskets with sturdy hooks rated for fruit weight keeps them safe. You’re creating a functional display that belongs in your kitchen, one that guests will notice and admire.
Tiered Displays Maximize Storage
While hanging baskets tackle your wall space, tiered displays maximize your countertops into vertical storage powerhouses. I’ve discovered that a 2- to 3-tier setup holds surprising variety while keeping everything accessible. You’ll place larger fruits on bottom tiers and smaller items on top, creating natural visual balance.
The benefit comes when you combine hanging baskets with tiered stands. You’re using every inch of available space. Your kitchen becomes an organized, purposeful display rather than scattered bowls.
| Tier Level | Best Fruits | Why It Works |
|---|---|---|
| Bottom | Apples, oranges | Supports weight |
| Middle | Bananas, pears | Easy access |
| Top | Berries, grapes | Visibility |
| Wall Space | Hanging produce | Frees counters |
| Overall Effect | Color-coordinated | Encourages healthy snacking |
Sturdy structures prevent tipping, keeping your display stable and bruise-free.
Hang or Stack Your Fruit Basket: Installation Options

Once you’ve chosen your basket style, the real magic happens when you decide how to display it, and hanging versus stacking fundamentally changes your kitchen’s functionality and look.
I’ve found that hanging installations work beautifully for smaller kitchens. Here’s what you’ll want to consider:
- Ceiling hooks: Install sturdy fasteners directly overhead for maximum visual impact
- Wall-mounted brackets: These offer flexibility and work in tight spaces
- Weight distribution: Lighter fruits prevent sagging; heavier produce needs reinforced anchors
- Air circulation: Hanging positions provide better ventilation and longer fruit freshness
- Layered arrangements: Tiered baskets create dynamic focal points while maximizing capacity
Stacking works when you’ve got counter or shelf real estate. The key difference is that hanging displays command attention as architectural elements, while stacked arrangements suit minimalist aesthetics.
I recommend hanging if you’re countertop-challenged, as it genuinely improves functionality for cramped kitchens.
Design Seasonal Fruit Baskets That Stay Fresh Longer

How do you create a fruit basket that lasts beyond a few days? I’ll tell you: seasonal freshness is everything. I prioritize fruits at peak ripeness—apples and oranges for winter, berries and peaches for summer. This strategy maximizes both flavor and longevity.
| Season | Star Fruits | Supporting Accents |
|---|---|---|
| Winter | Apples, Oranges | Cranberries, Pomegranates |
| Spring | Strawberries, Pineapple | Fresh citrus |
| Summer | Berries, Peaches | Melons |
I arrange strategically: heavier fruits anchor the bottom, delicate items rest on top. A quality liner protects produce while extending shelf life.
I mix vibrant colors—red apples, green grapes, yellow mangoes—creating visual interest without chaos. High-quality, well-washed fruits matter tremendously. These design choices keep your basket looking thoughtful and fresh, turning it into a kitchen display that actually lasts.
Keep Your Fruit Basket Display Organized Weekly

Why does your beautiful fruit basket lose its charm by Wednesday? Life happens—fruit wilts, organization slips, and your display becomes less inviting. I’ve found that keeping up with my fruit display makes a real difference in how fresh and appealing it looks.
Here’s my weekly organization routine:
- Refresh produce every seven days to maintain freshness and visual appeal
- Rotate by color and size, placing larger fruits at the basket’s bottom for stability
- Inspect the basket for wear, especially in woven materials that need gentle care
- Swap seasonal fruits to keep displays lively and aligned with what’s available
- Add a handwritten note or small decoration for that personal touch
This rhythm keeps my kitchen’s fruit basket looking intentional and welcoming. When we maintain what matters, it shows, and our spaces reflect that care back to us.
Make Your Display Accessible Without Sacrificing Style
A beautiful fruit basket that sits too high or too low defeats its purpose—you’ll either strain reaching for an apple or watch your display collect dust. I’ve found that positioning a hanging basket at eye level creates the sweet spot for both accessibility and visual appeal.
Pair your rustic wooden or wicker basket with a tiered stand nearby, keeping everyday fruits within arm’s reach. This combo works as both functional storage and a designed feature rather than mere decoration.
I like adding a small herb planter or handwritten label beside the arrangement, personalizing the space while reinforcing its purpose. Color-coding fruits by grouping red apples with citrus makes grabbing what you need effortless while maintaining that carefully planned look you’re after.